Integration with Tyler Cashiering
In New World ERP release 9.5, enhancements were made to integrate New World ERP and the Revenue Collections module with the Tyler Cashiering module.
This functionality requires some setup including 1) determining how payment codes are used between Tyler Cashiering and New World ERP, 2) creating cashier records in new world ERP to represent Tyler Cashiering cashiers, and 3) setting user security permissions for the new pages in Maintenance that allow users to complete the previous two setup procedures. For more information, see Setup below.
Also, see Revenue Collections Workflow Enhancements below for information on how Tyler Cashiering batches and receipts are represented and processed in new world ERP.
Setup
Security Permissions
Maintenance > new world ERP Suite > Security > Users > Select a user > Permissions
There are three new Tyler Cashiering related pages that require user permissions: the Payment Codes, Tyler Cashier Listing, and Tyler Cashiering Cashier pages, all of which are described below. To give users access to these pages, do the following:
- Navigate to the User List page: new world ERP Suite > Security > Users.
- Select a user who needs access to the Tyler Cashiering maintenance pages and click Permissions.
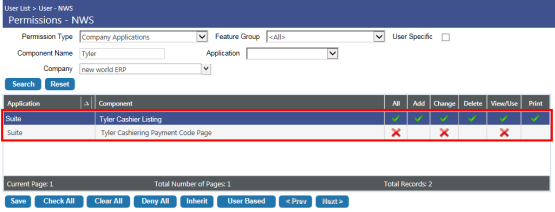
- Click Show Search in the right-hand corner of the Permissions page to display all search fields.
- In the Permission Type drop-down, select Company Applications.
- In the Component Type field, type Tyler.
-
Click Search. The Tyler Cashiering security components will display.
 Show me.
Note: You must be licensed for the Tyler Cashiering module to access Tyler Cashiering security components.
-
For each component, select the appropriate access permissions.
The Tyler Cashier Listing component controls access to the Tyler Cashier Listing and Tyler Cashiering Cashier pages. The Tyler Cashiering Payment Code Page component controls access to the Tyler Cashiering Payment Codes page. All of these pages are described below.
To grant access to a specific permission (e.g., Add, Change, etc.), simply click twice on the appropriate red X to make it a green check mark.
- Click Save to retain the changes.
Tyler Cashiering Payment Codes
Maintenance > new world ERP Suite > Revenue Collection > Tyler Cashiering Payment Codes
The new Tyler Cashiering Payment Codes page allows authorized users to 1) assign and maintain associations between payment codes and Tyler Cashiering payment types, 2) determine whether or not to use Tyler Cashiering batch numbers and receipt numbers in new world ERP, and 3) determine how payment codes are displayed in Tyler Cashiering.
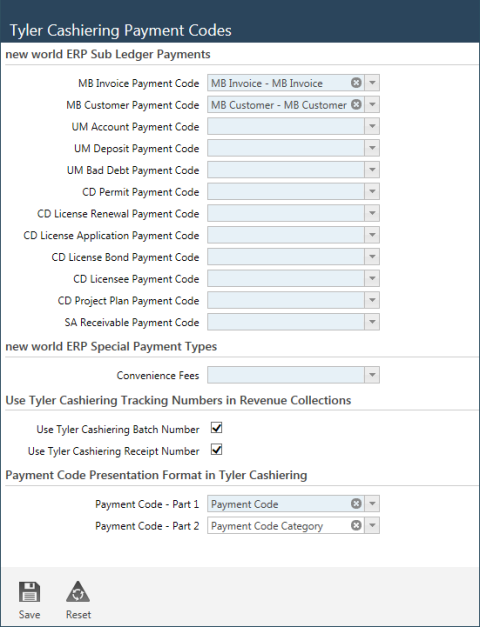
New World ERP Sub-Ledger Payments
Payment transactions processed in Tyler Cashiering for receivables tracked in new world ERP sub ledgers are not directly tied to new world ERP payment codes. In order to process transactions completely, administrators must associate the payment types they typically process with the payment codes that will represent those payment types.
The New World ERP Sub-Ledger Payments section of the Tyler Cashiering Payment Codes page lists the payment codes that can be associated with the Tyler Cashiering receivables that new world ERP currently supports.
To associate a payment code with a Tyler Cashiering payment type, simply click the drop-down control on a payment code field and, from the drop-down list, select the appropriate payment type.
Note: Some payment code fields may be disabled. Only those payment code fields associated with modules to which you are licensed will be enabled.
new world ERP Special Payment Types
If your organization utilizes convenience fees, use the Convenience Fees field in this section to indicate the payment code that will be used to process this type of fee. If a payment code for convenience fees is not specified, convenience fee payments processed through Tyler Cashiering will not be accepted in new world ERP.
Use Tyler Cashiering Tracking Numbers in Revenue Collections
Both new world ERP and Tyler Cashiering use batch and receipt (tracking) numbers. For cross-referencing purposes, the Use Tyler Cashiering Batch Number and Use Tyler Cashiering Receipt Number check boxes in this section give administrators the option of having a one-to-one relationship between the batch number in new world ERP and the batch number in Tyler Cashiering, and between the receipt number in new world ERP and the receipt (tracking) number in Tyler Cashiering.
If these check boxes are selected, new world ERP will store the Tyler Cashiering batch numbers on new world ERP batches, and Tyler Cashiering receipt numbers on new world ERP receipts. This accommodates those users who might want to use the Tyler Cashiering number instead of the new world ERP number.
Payment Code Presentation Format in Tyler Cashiering
This section allows the administrator to define how users will view and search for payment codes in Tyler Cashiering.
Note: This pertains to new world ERP miscellaneous payment codes, not payment codes that are tied to a sub ledger.
Users typically identify a payment code in one of three ways, by its Code, Description, or Category. The Payment Code - Part 1 and Payment Code - Part 2 fields allow the administrator to determine which one or two of these three identifiers should be used to represent payment codes in Tyler Cashiering.
For example, if Code is entered in the Payment Code - Part 1 field and Description is entered in the Payment Code - Part 2 field, then payment codes will display in the following format: Code - Description. For example, UWP - Utility Web Payment, where “UWP” is the code for the Utility Web Payment type and “Utility Web Payment” is the code description.
Tyler Cashiers
Maintenance > new world ERP Suite > Revenue Collection > Tyler Cashiers
Every transaction that gets entered into Tyler Cashiering will flow through that module into new world ERP’s Revenue Collections module. That being the case, in order to ensure that all transactions are logged to the correct cashier and all related security measures are properly deployed, every cashier in Tyler Cashiering that will be actively processing collection revenue batches must have a counterpart cashier record in new world ERP.
The new Tyler Cashiering Cashier page allows authorized users to make that connection, to link a Tyler Cashiering cashier to a new world ERP cashier. It also allows you to define user-specific information, such as whether or not a given user is currently an active cashier, what his or her default department and collection station are, and whether or not Tyler Cashier batches generated by the user should be automatically posted. For more information, see below.
Adding a Tyler Cashiering Cashier to new world ERP
-
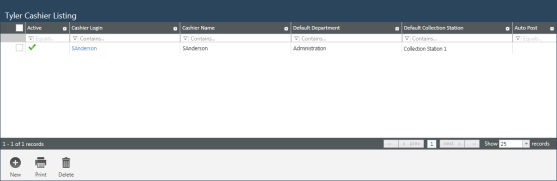
Open the Tyler Cashier Listing page: Maintenance > new world ERP Suite > Revenue Collection > Tyler Cashiers.
- Click the New
 button located at the bottom of the Tyler Cashiering Listing page.
 -
The Tyler Cashiering Cashier page will open. In the User Login field, enter a valid Tyler login or click this field’s associated drop-down
 button and select the login from the drop-down list. All active and inactive users are included in the drop-down list.
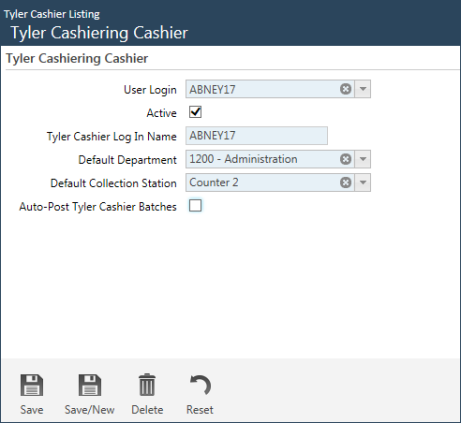
This page lists all the Tyler Cashiering Cashier records that exist in your new world ERP system. When accessed for the first time, the grid will be empty.
-
Select the Active check box to indicate that the user is an active Tyler Cashiering cashier, i.e., actively performing cashiering duties. New revenue collection batches can only be created by active opposed to inactive cashiers.
-
In the Tyler Cashier Login Name field, enter the cashier’s login name. The name can be up to 32 characters in length (alpha and numeric characters only, no special characters). The login name is required and must be unique, no duplicates are permitted.
-
In the Default Department field, enter the department with which the cashier will be associated by default. This field is required for approval processing reasons, and because when a user in Tyler Cashiering creates a receipt, the new world ERP system will check if there’s an existing batch to tie it to; if there isn’t, a new batch will be created. For this, the user’s default department is needed.
-
In the Default Collection Station field, enter the collection station with which the user will be associated by default. This field is required for approval processing reasons, and because when a user in Tyler Cashiering creates a receipt, the new world ERP system will check if there’s an existing batch to tie it to; if there isn’t, a new batch will be created. For this, the user’s default collection station is needed.
-
The Auto-Post Tyler Cashier Batches check box allows you to determine what happens when a Tyler Cashiering batch is closed at the end of the day.
Note: If a user clears the Active check box for a previously active cashier, the system will check if any Tyler Cashiering batches exist for the cashier. If there are, an error message similar to the following will display: “Unposted Revenue Collection Batches exist for this Tyler Cashier. These Revenue Collection Batches must be posted before the Tyler Cashier can be made inactive.”
For cross-referencing purposes, the Tyler Cashier Login Name ties the cashier to the login they use in the Tyler Cashiering system.
Note: The user must have “Revenue Collection - Receipt Entry” Process Manager rights to the selected department.
Note: The selected collection station must be a valid collection station and the cashier must have user-based security rights to the station.
If the check box is selected, when a batch is closed in Tyler Cashiering, the batch will be automatically closed in new world ERP as well. The cashier will not have to go into new world ERP and complete the approval, validation, and posting processes again; instead, the system will execute all those steps automatically.
If the check box is cleared, when a batch is closed in Tyler Cashiering, the batch will be automatically pushed through the approval and validation processes, but it will not be posted.
-
Click Save to save the new cashier record.
The record will then be added to the Tyler Cashiering Listing grid (see above). From there it can be viewed, selected for modification, printed, or deleted.
Editing a Tyler Cashiering Cashier Record
To modify a Tyler Cashiering Cashier record, do the following:
- Open the Tyler Cashier Listing page (see above): Maintenance > new world ERP Suite > Revenue Collection > Tyler Cashiers.
- In the Cashier Login column, the individual login names are also hyperlinks. Click on the login name whose record you would like to modify. This will open the Tyler Cashiering Cashier page in Edit mode for the selected cashier.
- Make the necessary modifications and click Save to save your work.
Revenue Collections Workflow Enhancements
This section describes how the workflow in the new world ERP Revenue Collections module has been modified to view and process batches tied to the Tyler Cashiering module.
- As indicated above, every transaction that is entered in Tyler Cashiering will flow through that module into new world ERP’s Revenue Collections module. Everything that gets receipted in Tyler Cashiering will create a receipt in new world ERP.
- When a cashier completes a receipt in Tyler Cashiering, the receipt goes through a validation process. After the receipt passes validation, it will be created in the new world ERP Revenue Collections module.
- Based on the provided cashier identifier and Tyler Cashiering batch number, the system will determine whether or not a new world ERP receipt batch already exists. If so, the receipt is tied to that batch.
If a batch does NOT already exist, a new world ERP batch will be created as long as the receipt passes all related validations (e.g., the associated cashier is valid, active as a cashier, authorized to the specified department and collection station, and has Process Manager rights to the department’s Revenue Collection process).
Also, if the cashier has any other open Tyler Cashiering revenue collection batches, a warning message will display.
After the new world ERP Revenue Collection Batch has been created, a confirmation message is sent to Tyler Cashiering.
-
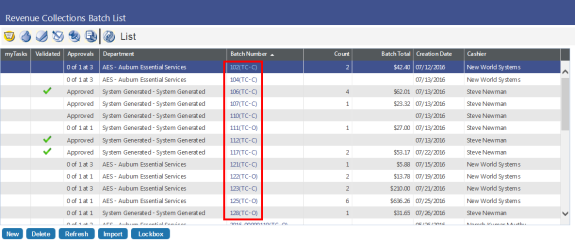
Like new world ERP batches, Tyler Cashiering batches display in the Revenue Collections Batch List page grid (see below). Tyler Cashiering batches are differentiated from Revenue Collection batches by their batch numbers. At the end of each Tyler Cashiering batch are the letters “TC”, indicating Tyler Cashiering, followed by a hyphen and either an “O” or a “C”, which represent open and closed batches respectively. For example, in the screen shot below, batch number 102(TC-C) is a closed Tyler Cashiering batch and 111(TC-O) is an open Tyler Cashiering batch.
-
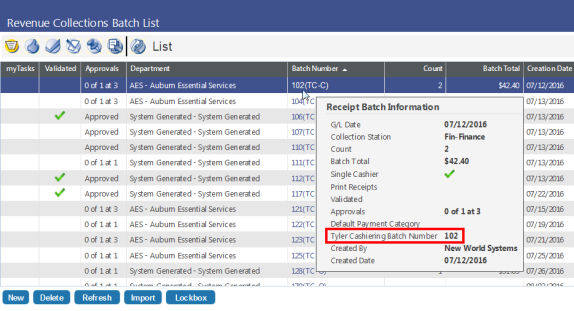
Hovering over a batch number displays the Receipt Batch Information pop-up window (shown below). For reference purposes, the Tyler Cashiering Batch Number has been added to this popup so users can see what the original Tyler Cashiering batch number is.
-
When a receipt that is tied to Tyler Cashiering is opened via the associated batch, Tyler Cashiering batch and receipt numbers are included in the general receipt detail.

- When receipts that are tied to Tyler Cashiering are viewed in Inquiries, Tyler Cashiering batch and receipt numbers are included in the general receipt detail. For these receipts, the Status in the Inquiry page refers to the Tyler Cashiering status, not the Revenue Collections status.
- When receipts that are tied to Tyler Cashiering appear in reports, Tyler Cashiering batch and receipt numbers are included in the receipt detail.
Open Tyler Cashiering batches cannot be modified in new world ERP. Users can see here that the open Tyler Cashiering batches exist, they can view batch detail, but they cannot process them or change them in any way. They have to be closed in order to process them.
Completed or closed Tyler Cashiering batches, however, can be processed all the way through to posting, which is to say, they can be approved, validated, printed, etc.